
Why create a dedicated Planable Onboarding Hub?
If you're on the Enterprise Plan in Planable, you'll get a dedicated Customer Success Manager to guide you through onboarding. But even with that support, it's important to have your own internal documentation. Why? Because no one knows your team's roles, workflows, and processes better than you do.
When you're moving your social media workflow to Planable, from spreadsheets, or other scheduling tools, the biggest challenge isn't learning the platform. It's figuring out where to start, who to ask and how content flows.
An internal onboarding hub solves this by putting everything in one place:
- How to log in and set up Planable — including desktop and mobile access
- Who manages approvals and publishing — so there's no confusion over responsibilities
- Which workflow your team follows — from drafting to publishing and everything in between
- Where to find tutorials, FAQs and help contacts
The 5 building blocks of your onboarding hub (best practices)
Think of your onboarding hub as a map: it shows every new teammate where to go, who to ask and how content actually moves through Planable.
Here are the 5 core building blocks every effective onboarding hub should include:
1. Getting Started Basics

A simple walkthrough for new users to start using Planable.
- How to accept your Planable invite and create an account.
- How to collaborate and leave feedback.
- How to use the web version on desktop for full features, or the mobile app for content on the go.
- Profile setup (such as personal notifications preferences).
- A quick "first-week" checklist so they can be able create or approve their first piece of content quickly (depending on the role).
Some teams also add role or department-specific setup steps — for example, social teams might be in charge to connect social media channels in Planable, while content creators have to connect Planable to their Canva accounts.
2. Roles & Permissions
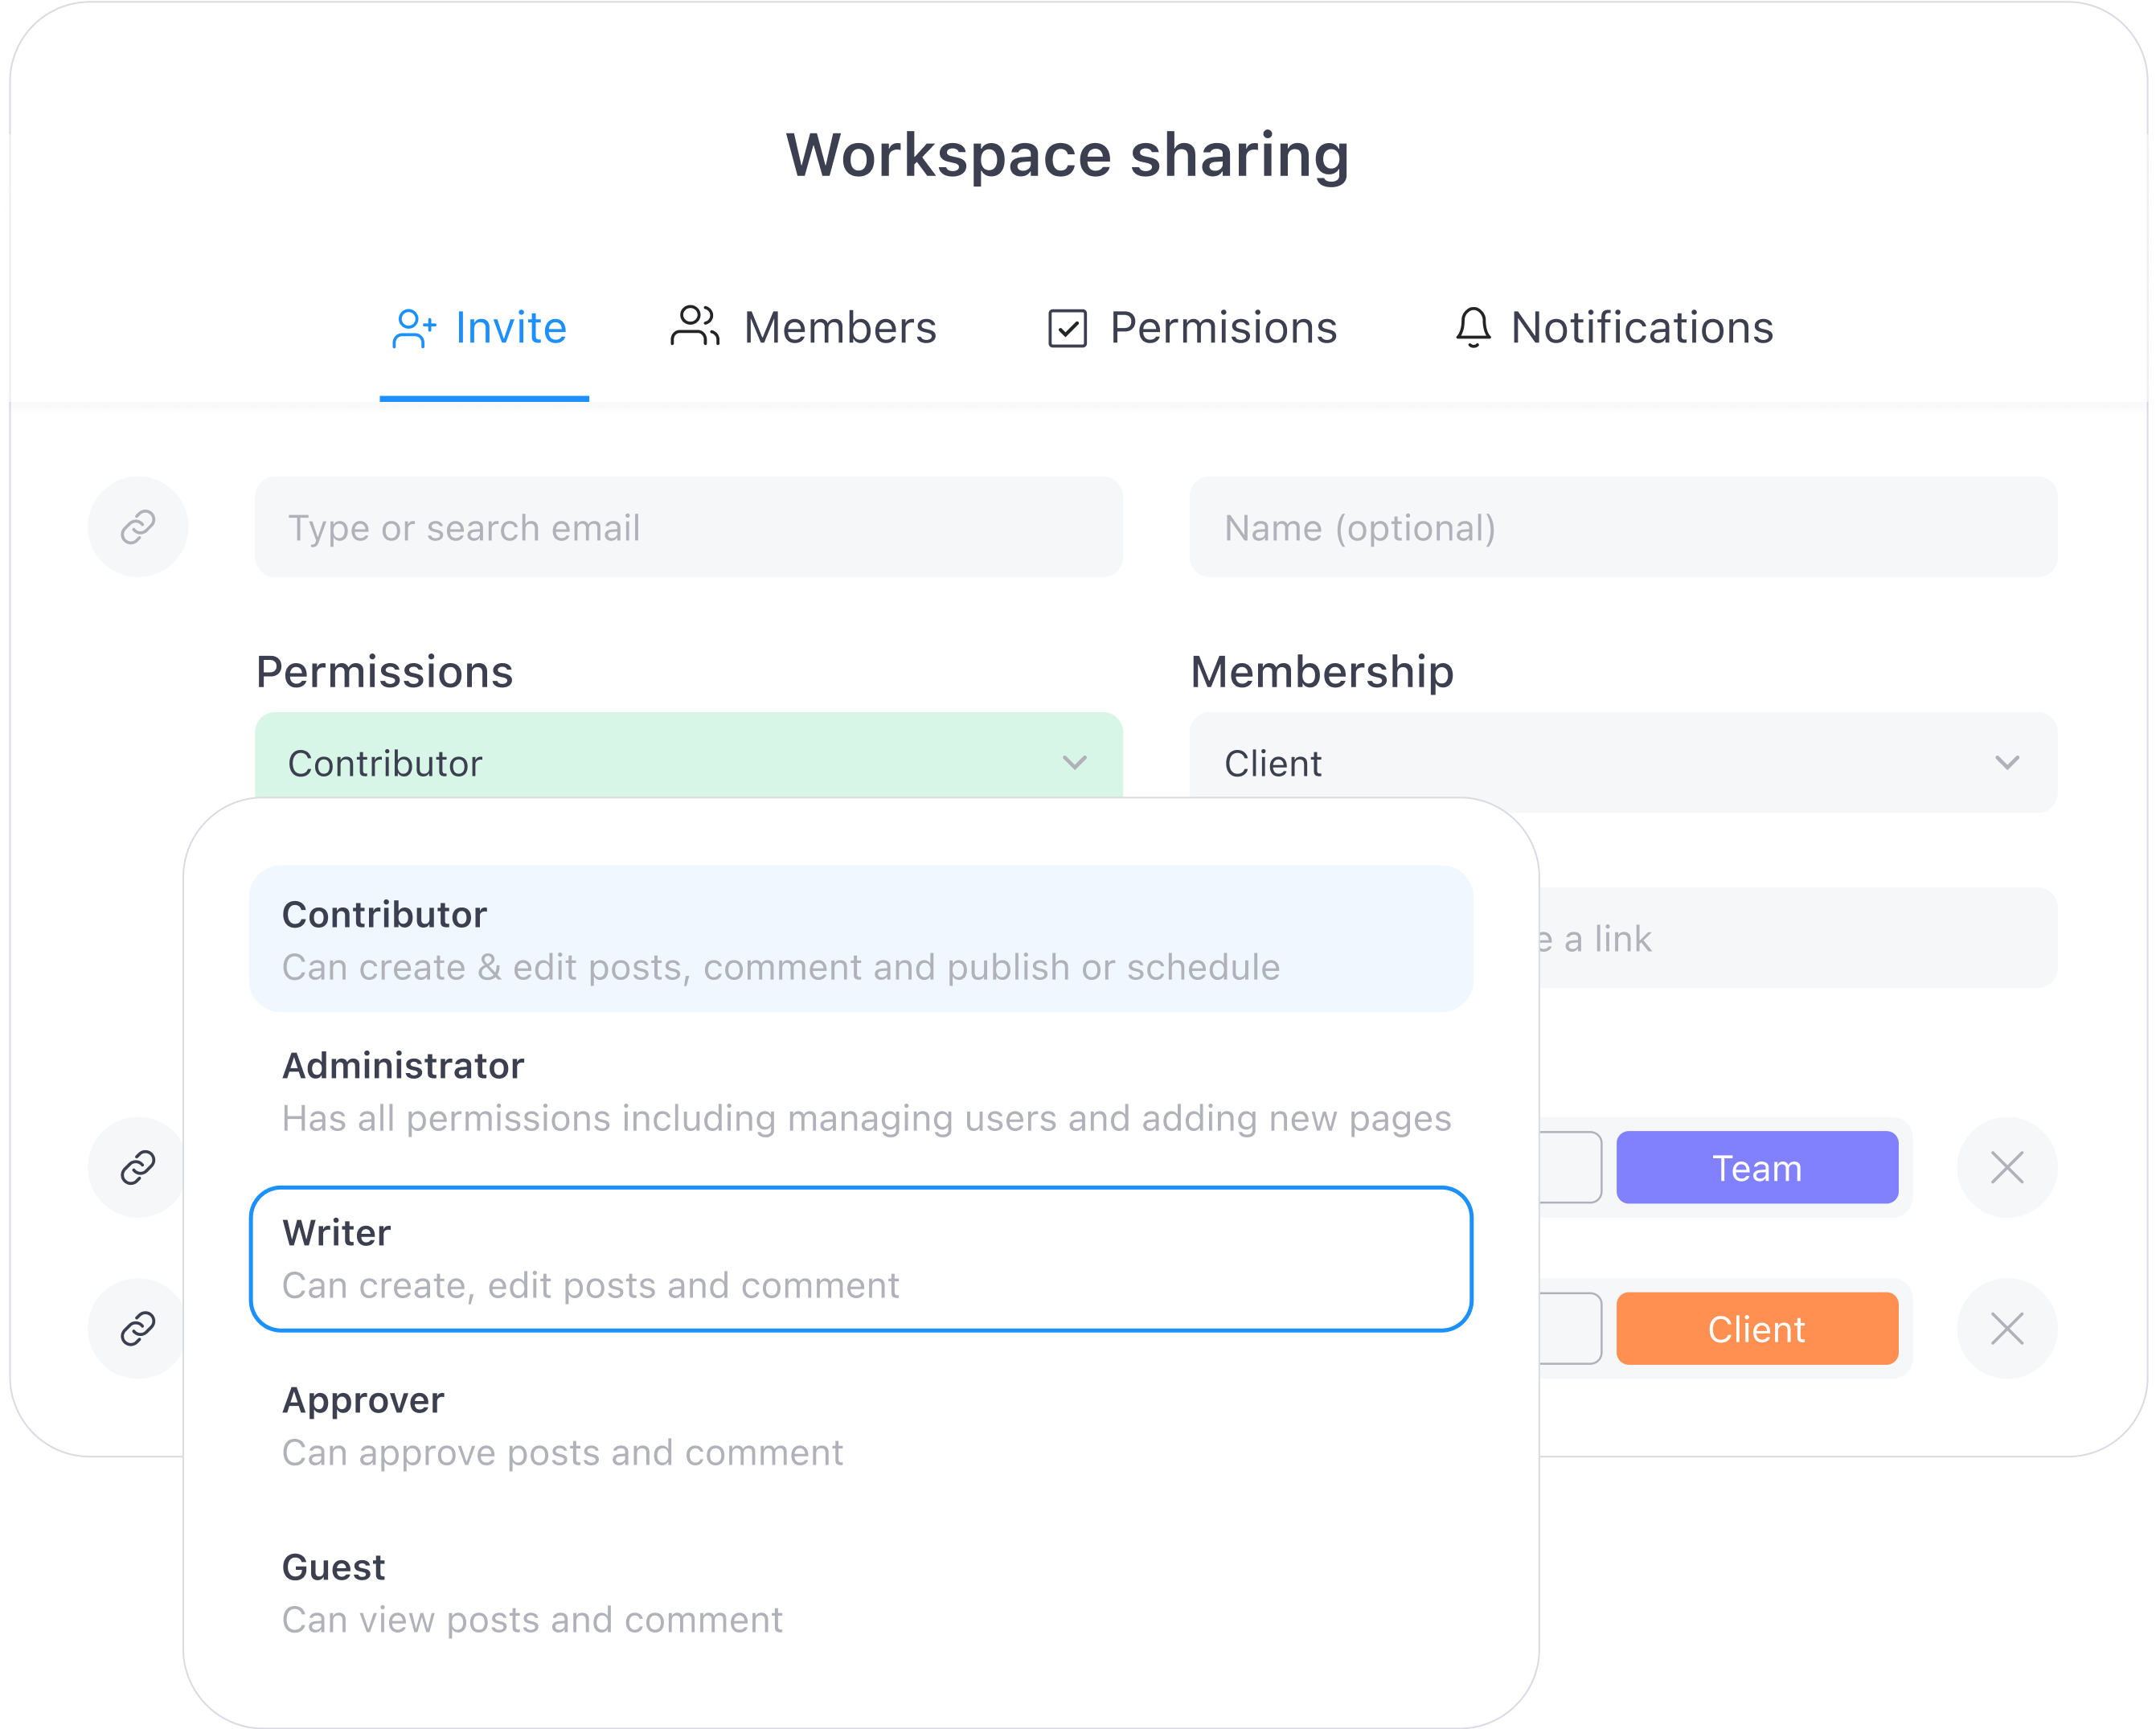
This block should bring clarity on who does what. It could:
- Define each role (Admin, Contributor, Writer, Approver and Guest) and what they can/can’t do
- Explain who manages approvals and publishing in each department. Every workspace in Planable usually represents a client, brand or department. If your team manages multiple workspaces, it's important to know who owns for instance approvals internally (aside from the client, if that's the case) and publishing in each one. Typically, administrators or department leads are in charge of the final approval internally, while contributors or social leads handle day-to-day content creation and publishing.
- Provide a process for requesting role changes or additional access. Sometimes a teammate will need higher permissions — for example, moving from Writer to Contributor so they can schedule posts.
To ensure your team knows exactly where to go, it's best to document a simple procedure in your onboarding hub:
- Request for change → Teammate contacts their department admin or team lead
- Decision → Admin/manager decides whether to approve
- Implementation → If approved, the admin updates the role directly in Planable
At the beginning of the onboarding in Planable, you can temporarily assign clients an admin role to connect social media accounts directly into Planable. This way, teams never have to ask clients for login credentials — admins handle it securely.
3. Approval Workflows
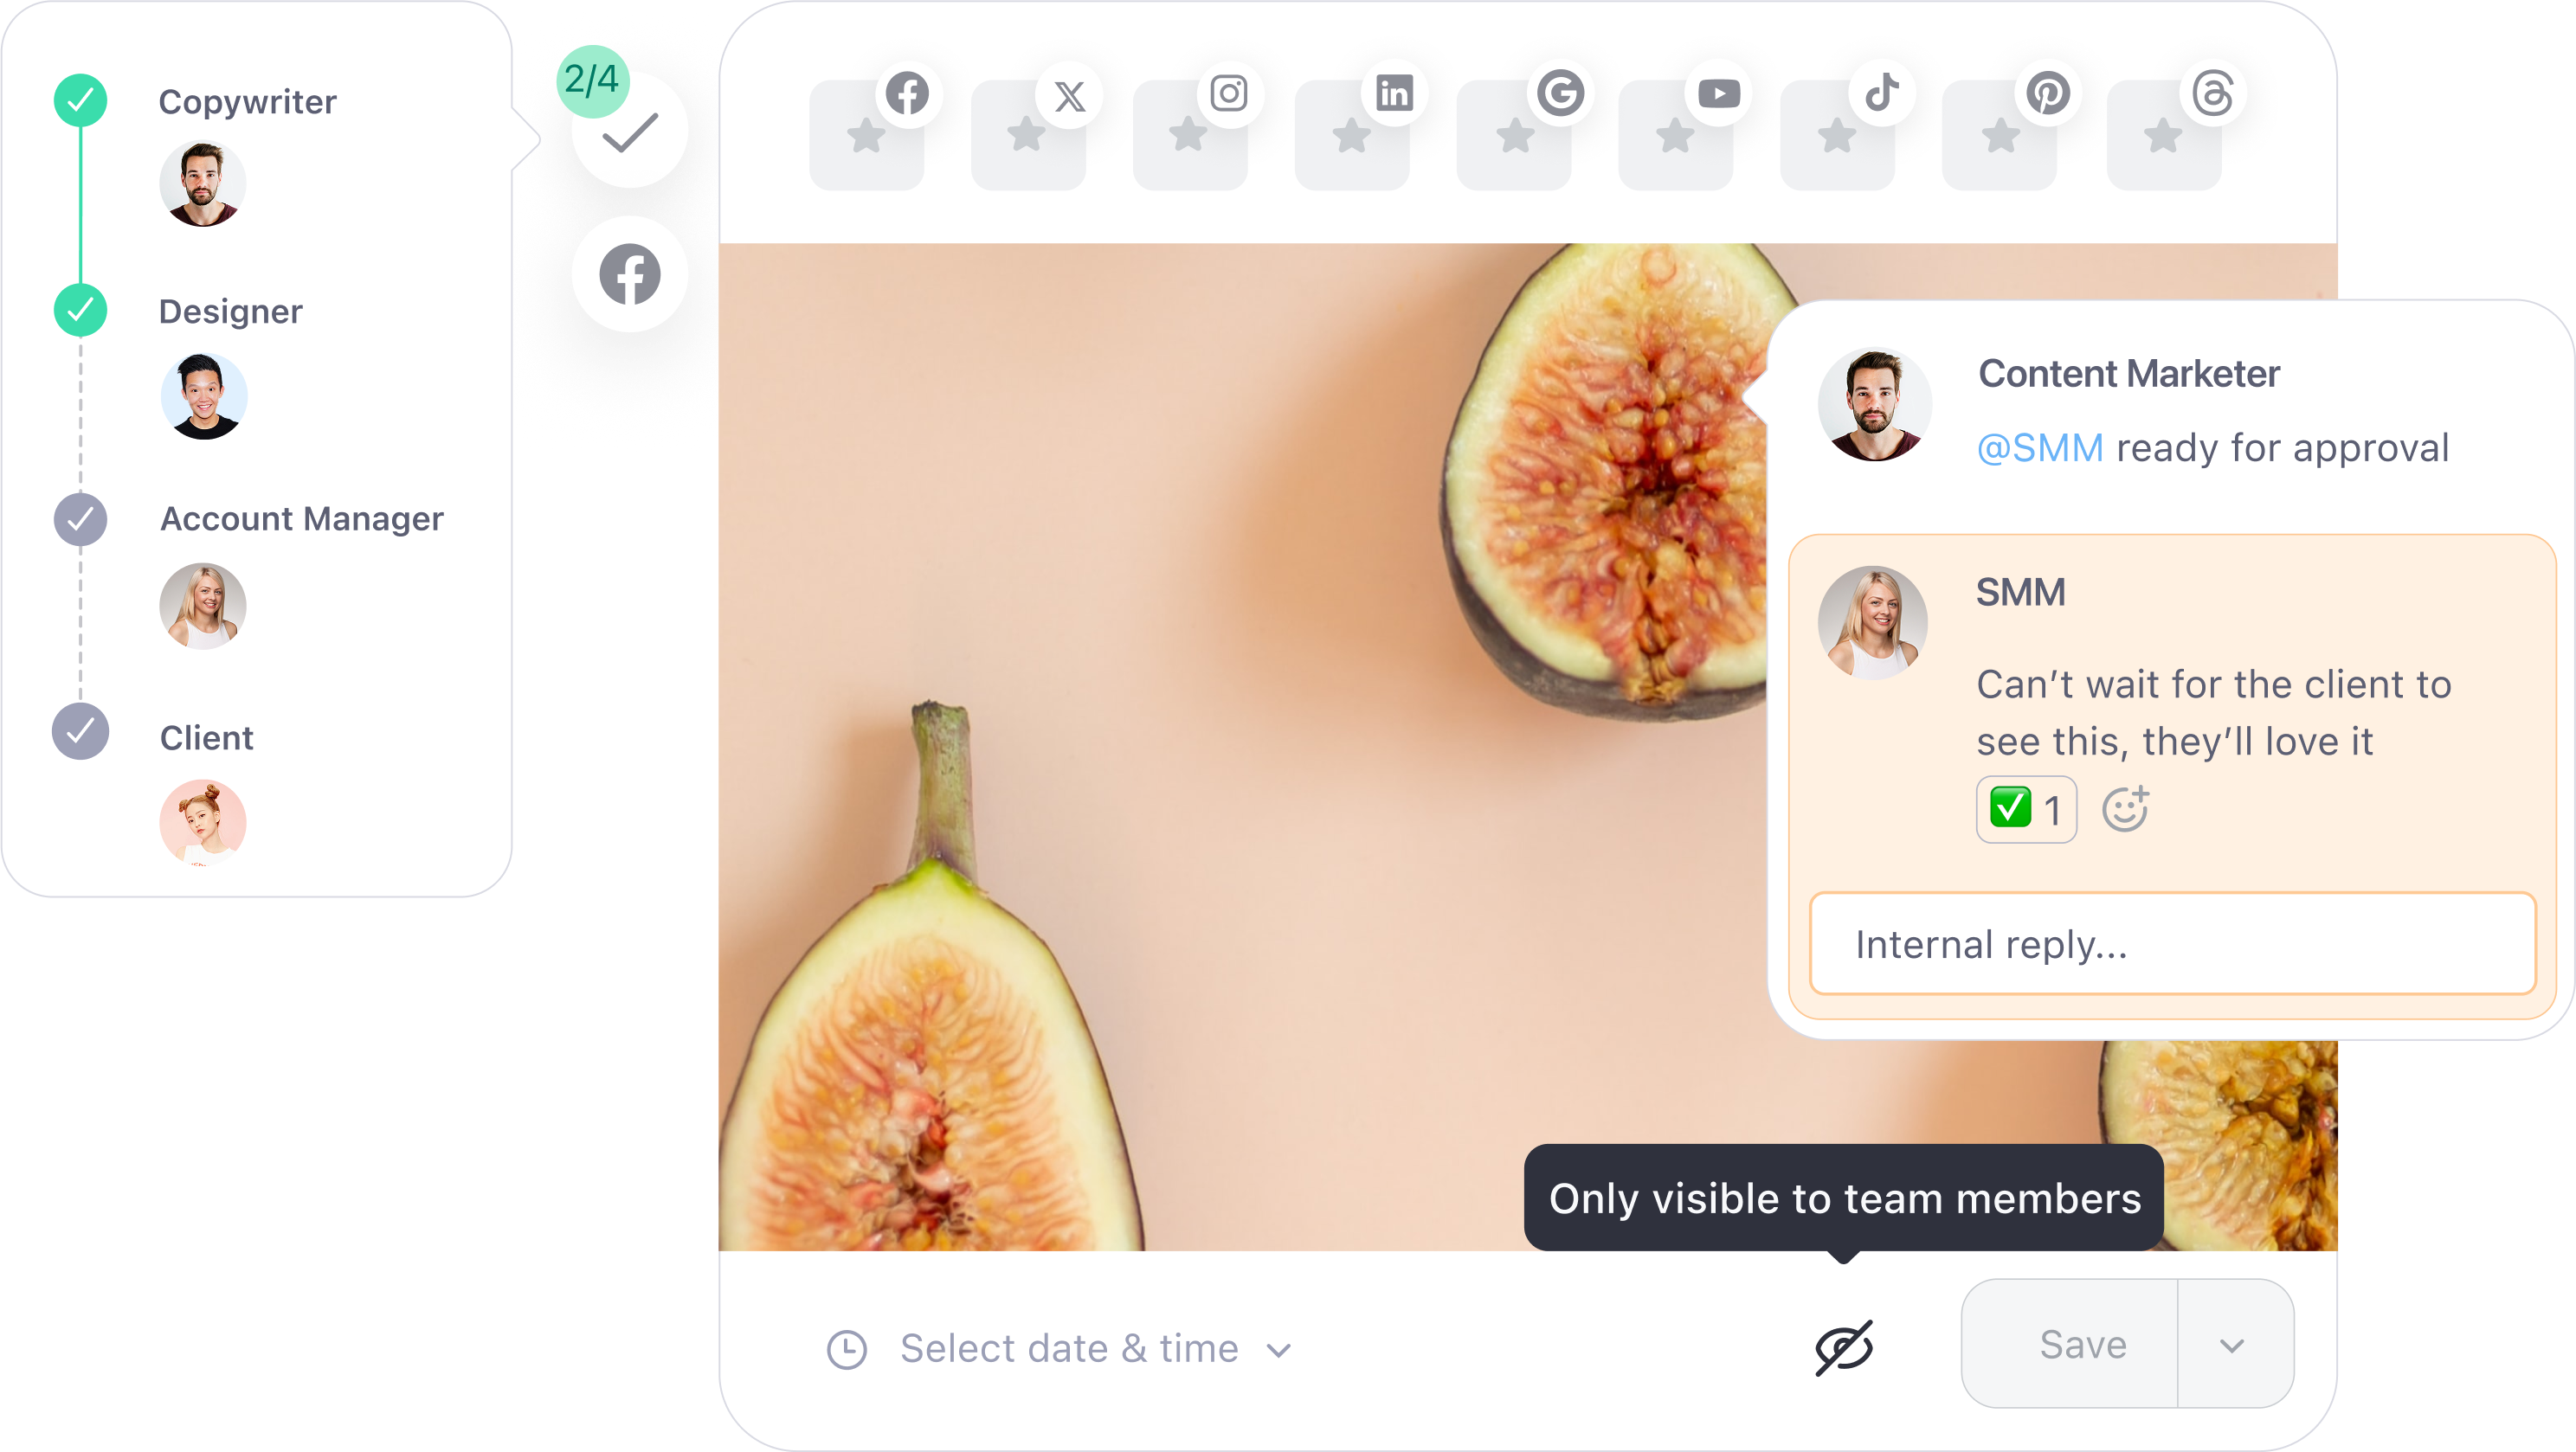
Including a clear Approvals section in your onboarding hub helps everyone understand exactly how content moves from draft to published post. Planable also makes it easy to mirror your team's real approval workflow thanks to the four approval type features that are available.
Choose from the approval flow examples to guide your setup.
The exact path can look very different depending on your workflow or department. Here are 3 common examples:
Example 1: One level approval workflow
Draft → Approval and publish. This flow is ideal for fast-moving teams or low-risk content, where one person approves the content before it is scheduled and automatically goes live on the set date and time. This workflow in Planable can be enabled with the Optional approval.
Example 2: Content lifecycle workflow
Draft → Review → Internal approval → Client approval and publish. This option is best for smaller teams or straightforward content creation process where creators draft, managers review and approvers (both internal team member and the client) give the final green light before publishing. This is called Required approval in Planable.
Example 3: Department creation workflow
Content Creator → Design Team → Legal → Executive Lead. This one is often used for larger organizations, where content passes through multiple checkpoints before being published. This uses Planable's Multiple level workflow type.
To sum up, here are the approval types that you can consider implementing in Planable:
Escalation paths for urgent or time-sensitive posts
For critical posts (like time-sensitive announcements), it is best to document an exceptional “fast-track” process so everyone knows who to contact directly.
For efficiency, teams set "backup approvers" so urgent posts don't get stuck if the main approver is not available.
Additionally, approvers often use custom views in Planable — filtered calendars or lists that show only the posts waiting on their sign-off. Clear rules on responsibility levels, combined with these customized calendar/list views, keep things moving when timing really matters.
4. Training & Support
This block makes it easy for teammates to learn the platform and know where to turn when questions come up. It could:
• Link to Planable tutorials, such as:
Planable Platform Overview - Complete tutorial covering all core features
Planable for Brands - Brand-specific workflows and best practices
• Link to Help Center articles so users can self-serve answers quickly
• Provide internal resources like brand guidelines, content standards, or workflow documentation
• Show where to ask for help — whether that's department leads, admins or a dedicated Slack/Teams channel
• List key contacts for each department or content area so teammates know exactly who to reach out to
We also have a full Getting started with Planable article in our Help Center. It's a step-by-step guide to setting up accounts, creating workspaces, connecting pages, and collaborating — perfect for teams who want the complete picture of how everything fits together.
If Slack is already your team's main communication channel, Planable also supports Slack integration. Once connected, you can receive Planable notifications (like approvals, comments, or updates) directly in your chosen Slack channel, keeping all content-related conversations in one place.
Other considerations
Pick your tool
Your onboarding hub doesn't need to be fancy. Notion, Confluence, Google Docs, or Coda all work. The only rule? Make sure everyone knows where it lives.
Mirror your Planable setup
Structure your hub around the same areas you will use in Planable, like Roles and Permissions, Approvals, and others. This way, the doc feels like an extension of the tool.
Keep it alive
Your onboarding hub doesn't need constant updates, but it should stay relevant. Review it whenever there's a change that impacts how your team uses Planable — for example, if someone leaves or joins in a key role, if approval flows shift or if new features are added.